This article of Geeabo teaches everything you need to know about the WP Super Cache Settings 2020.
If you’re new to the cache plugin, I’ll show you how to get started with it.
And if you’re already using WP Super Cache Plugin, I’ll reveal advanced tips to get more from it.
If you want to get most out of WP Super Cache, you’ll love this guide.
What is Cache?
As you all know, that in computing, the cache is a software component that stores data in your device storage.
So that in future requests for that data can be served faster.
The data stored in a cache might be the result of an earlier computation.
And when we are talking about WordPress, then WP Super Cache Plugin will cache WordPress files as static files.
These static files are then served to users, reducing the processing load on the server.
WP Super Cache improves the performance hundreds of times for the reasonably static pages.
In Simple words, the cache plugin helps the user to access the files, folder, and posts, pages very quickly.
Cache plugin helps you to improve the performance of your website.
When you use a cache plugin on your WordPress website, it enhances the user experience.
What is WP Super Cache Plugin?
WP Super Cache plugin is an official plugin By Automattic.
It is the best plugin to optimize the site’s loading speed and all.
WP Super Cache is a very fast caching engine for WordPress that produces static HTML files.
Why there is a need to use WP Super Cache Plugin?
Friends, Nobody likes a slow website.
As we all know, caching mechanisms help in saving the server execution time and reducing the overall load time of a page.
This plugin generates static pages of your site and helps in reducing the page load time.
So, using a cache plugin is the best way to optimize your website.
Finally, The WP Super Cache Settings 2020 are Here.
Optimize your Website in 2020.
Follow the few easy steps to Setup WP Super Cache Settings.
#1. Login to WordPress Dashboard.
#2. Now move your cursor to Plugins and click on Add New.
#3. Now find the WP Super Cache Plugin using the search option.
#4. Here, at the top of the page, you will see the WP Super Cache plugin by Automattic, Install and Activate it.
#5. After Activating the plugin, move the cursor to Settings and click on WP Super Cache.
Now let’s know about each section of this Plugin one by one.
- Easy
- Advance
- CDN
- Contents
- Preload
- Plugins
- Debug.
I’ll discuss each one by one.
So grab a cup of coffee, silent your phone and do this carefully.
Easy
The very first thing you need to do is, Select the Caching On (Recommended) option and click on the Update Status button.
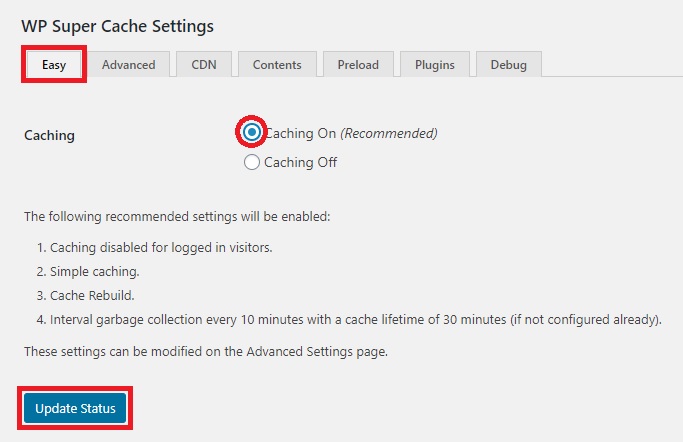
Now, your cache plugin starts working.
Advance
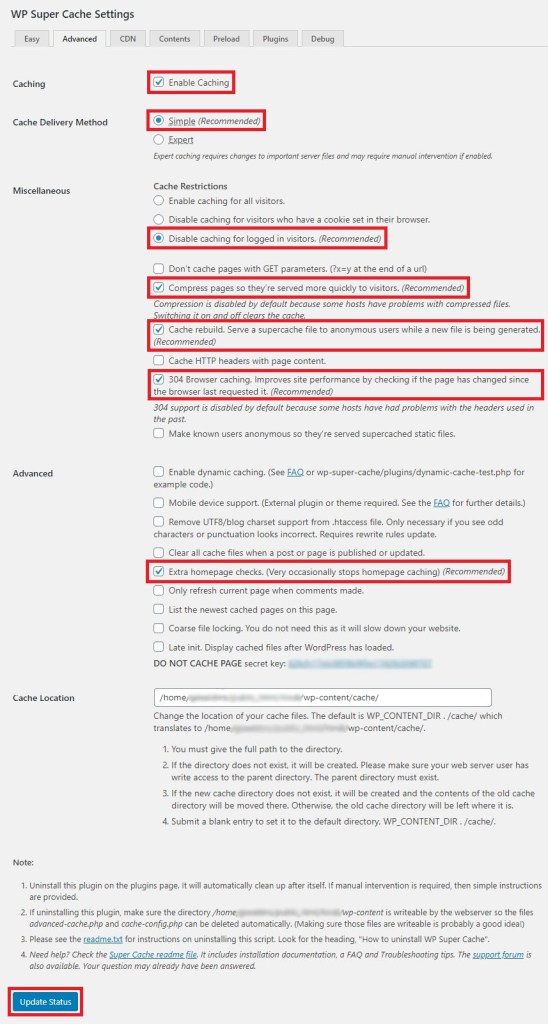
Tick the first, Enable Caching option.
Now, Under the Cache Delivery Method, makes sure that Simple (Recommended) is selected.
Now, Under Miscellaneous, make sure that:
- Disable caching for logged-in visitors. (Recommended).
- Compress pages so they’re served more quickly to visitors.
- Cache rebuild. Serve a supercache file to anonymous users while a new file is being generated.
- 304 Browser caching. Improves site performance by checking if the page has changed since the browser last requested it.
These four options must be selected.
Lastly, make sure that the Mobile device support and Extra homepage checks are selected.
After changing these settings, scroll down and click on the Update Status button.
By doing these settings, your WordPress blog performs much better than before and improve your site loading speed too.
CDN
CDN stands for content delivery network or content distribution network.
It helps you to accelerate your content around the world.
The main benefits of using CDN in WordPress are scalability, reliability, and performance.
You may or may not Enable CDN Support.
On my website, I’ve not enabled this option.
So, you can also skip this part.
But if you still want to enable this, tick the Enable CDN Support option, and click on the Save Changes button.
Contents
This option is given under the plugin to Regenerate content cache stats.
You can do this by clicking on the Regenerate cache stats link on under cache contents.
Preload
You should skip this section because this will cache every published post and page on your site.
It will create super cache static files, so unknown visitors (including bots) will hit a cached page.
Lastly, You don’t need to change anything in the Plugins and Debug option.
So, skip these two options too.
Now Completed.
Let’s check your site’s loading speed.
So, this was the Complete Guide to Setup WP Super Cache Settings.
I hope it helps you.
You can also read this to increase your knowledge.
- Add Google Analytics to WordPress Without Plugin.
- PHP Update Required – Running on an Insecure Version of PHP – Fix.
- Go Back To Previous WordPress Editor – Gutenberg to Classic.
- Search Engine Optimization And Why Is It Important.
If you have any questions or suggestions regarding this article, feel free to drop a comment in the comment box below.
No matter whatever your comment is.
So, write your comment without any hesitation.
If you liked this article, Do Like Comment and Share it On Facebook, Twitter, and other Social Networks.
And if you are having trouble finding an article, please leave your comments on our blog.
Thank you for coming.
Geeabo.